5 Ways to Find Where Images Are Used in WordPress
You’ve been staring at Media Library for ten minutes now.
Hundreds – maybe thousands – of images stare back at you. Which ones are actually powering your live pages? Which can you safely delete without breaking your homepage banner or a product gallery?
Okay, maybe this hasn’t happened to you yet, but it’s very possible, especially if you have years of uploads that have bloated your database. Maybe your storage costs are climbing, and you need to free up some space, or you’re migrating a huge website. Or, worried about accessibility, you want to update alt text, but can’t track down every instance that needs fixing.
Here’s what most people don’t realize: WordPress already tracks these image relationships in five specific places.
Once you know where to look – and have the right tools to surface this hidden data – finding image usage becomes routine maintenance instead of detective work. We’ll walk through five proven methods, with Admin Columns turning those invisible connections into sortable, filterable columns you can actually work with.
Why does WordPress show images as “unattached” when they’re in use?
WordPress marks images as “unattached” when they lack a parent post ID, even if they’re actively used through direct URLs, widgets, or page builders. This confusing label has caused countless site owners to hesitate before cleaning their media libraries.
Here’s the problem: WordPress’s attachment system only tracks where images were initially uploaded, not where they’re currently used.
Think about it – you upload an image while editing a blog post. WordPress assigns that post as the image’s “parent.” But then you:
- Insert that same image into three other pages using its URL.
- Add it to a widget in your sidebar.
- Feature it in an Elementor hero section.
WordPress still shows it as attached to that original post. When you delete it, the image becomes “unattached”, even though it powers critical elements across your site.
This makes it very hard to tell which ones are truly orphaned and which are secretly running your most important pages.
🤔Did you know? Page builders like Elementor and Divi store image references in their own data structures (often JSON or serialized arrays) that bypass WordPress’s traditional attachment tracking entirely. That’s why even your homepage hero image might show as “unattached.”
The 5 places WordPress actually stores image references
Understanding these five storage locations transforms image management from guesswork to science:
1. Featured image meta field
WordPress stores featured images as attachment IDs in the _thumbnail_id post meta field. This is the most reliable relationship to track.
2. Post content URLs
Direct image URLs embedded in post/page content – whether added via the block editor (including within Gutenberg blocks) or classic HTML. These appear as full paths like /wp-content/uploads/12/hero-image.jpg.
3. Gallery shortcodes
References stored within gallery shortcode parameters in post content using comma-separated attachment IDs:
[gallery ids="42,156,789,234"]4. Widget areas
Images added to:
- Sidebar widgets.
- Footer sections.
- Header areas through the theme customizer.
- Custom widget zones.
Widget configurations are stored in the wp_options table under entries like ‘sidebars_widgets’ as serialized arrays.
5. Custom field data
Page builders and plugins create their own storage systems:
| Storage type | Where it lives | Example |
| ACF Image Fields | wp_postmeta | Stores attachment ID |
| Elementor Sections | wp_postmeta & post content | JSON-encoded data |
| WooCommerce Galleries | Product meta | Comma-separated IDs |
| Custom theme options | wp_options | Serialized arrays |
The game-changing insight: Once you understand these storage locations, finding image relationships becomes routine data management instead of forensic investigation.
You’re not hunting for mysterious connections anymore – you’re simply checking five known locations.
How to find where images are being used
Finding image relationships in WordPress doesn’t require detective work or database spelunking. With the right approach, you can transform those mysterious connections into visible, manageable data. We’ll walk through five methods, starting with the most user-friendly option that turns your Media Library into a powerful relationship tracker.
Way 1: Use Admin Columns for instant visibility
Manually checking where images are used in WordPress is slow and unreliable, especially when images appear in custom fields, WooCommerce galleries, page builders, or reused content. Admin Columns adds direct usage information to your Media Library, so you can instantly see where an image is being used before deleting it.
Admin Columns transforms your Media Library from a basic file list into a relationship dashboard. Instead of clicking through individual attachments hoping to spot connections, you see everything at once.
With Admin Columns, you can view image usage directly inside the WordPress Media Library, including:
- Featured Images
- Content Editor Usage
- ACF Image Fields
- WooCommerce Product Galleries
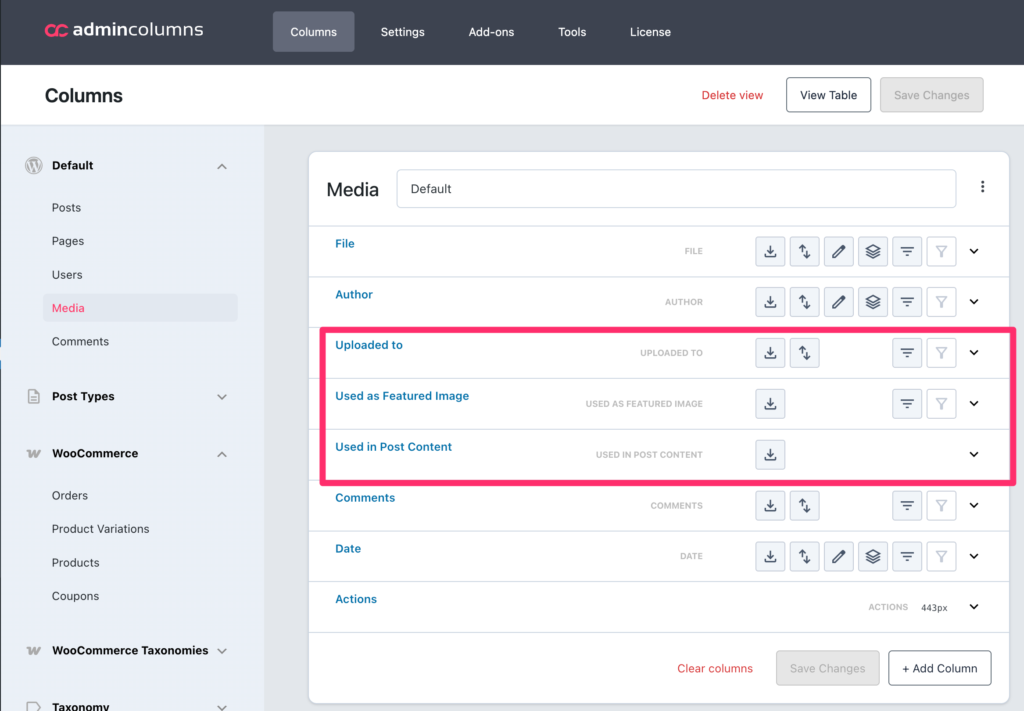
Features Images
The “Featured Image” column (Pro feature) immediately shows which images serve as featured images anywhere on your site – a simple yes/no that answers one of the most common questions.
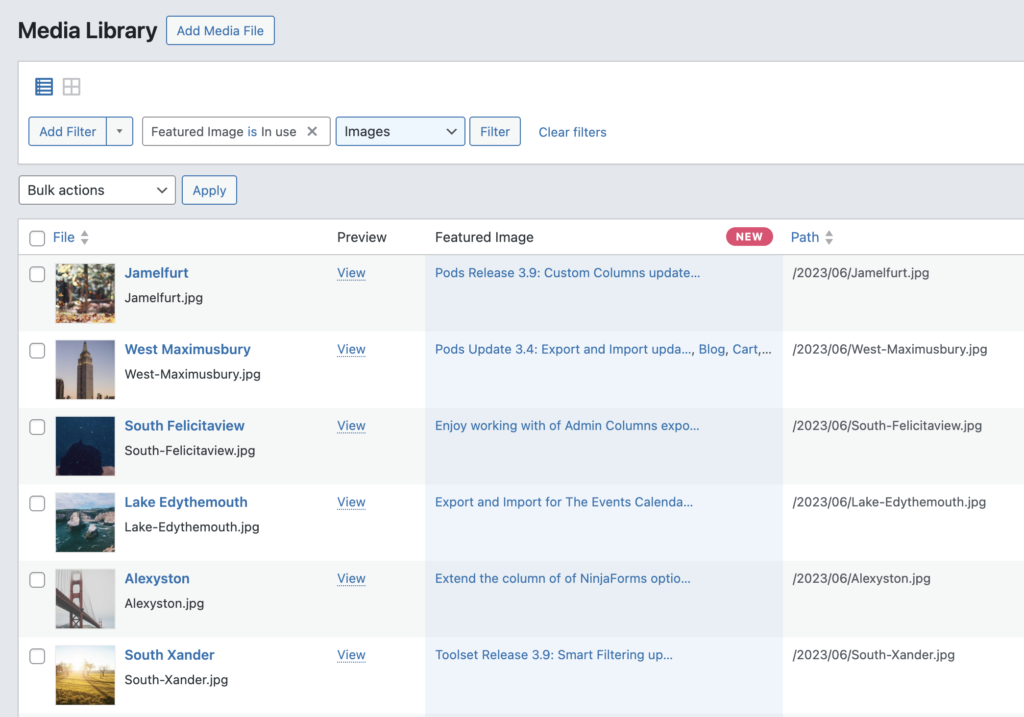
Content Editor Usage
We have also introduced a new “Used in Post Content” column in the WordPress media library, showing exactly how many posts use each file. It scans both the post content including Gutenberg blocks, giving you a complete view of where media is used.
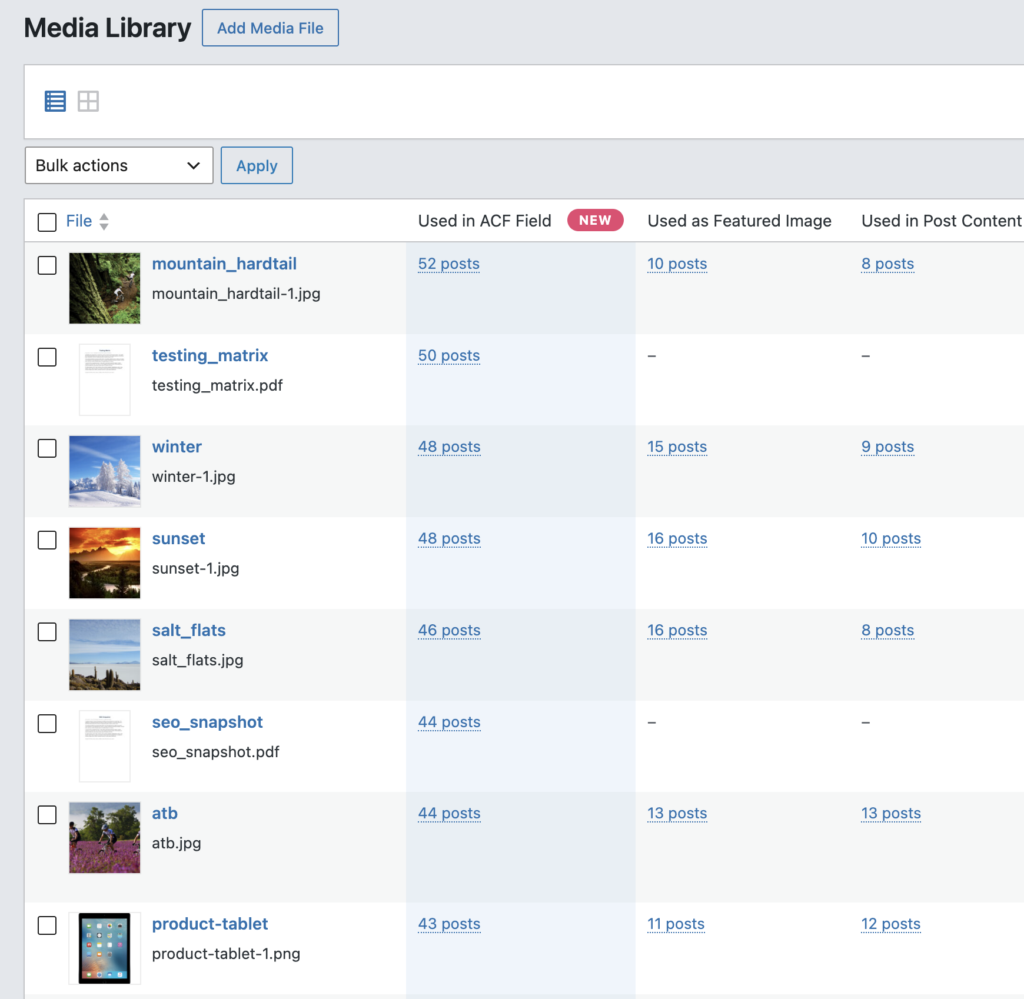
ACF Image Fields
For ACF image and file fields, Admin Columns adds a dedicated “Used in ACF Field” column to the WordPress Media Library. This column instantly shows how many posts, pages, or custom post types are using a particular image or file inside an Advanced Custom Fields field.
Images stored in ACF fields are often invisible from the default Media Library view, which makes active files appear “unused” even when they are still displayed somewhere on your site. With the “Used in ACF Field” column, you can immediately identify where an image is connected, making it much safer to clean up your media library without accidentally removing content that is still in use.
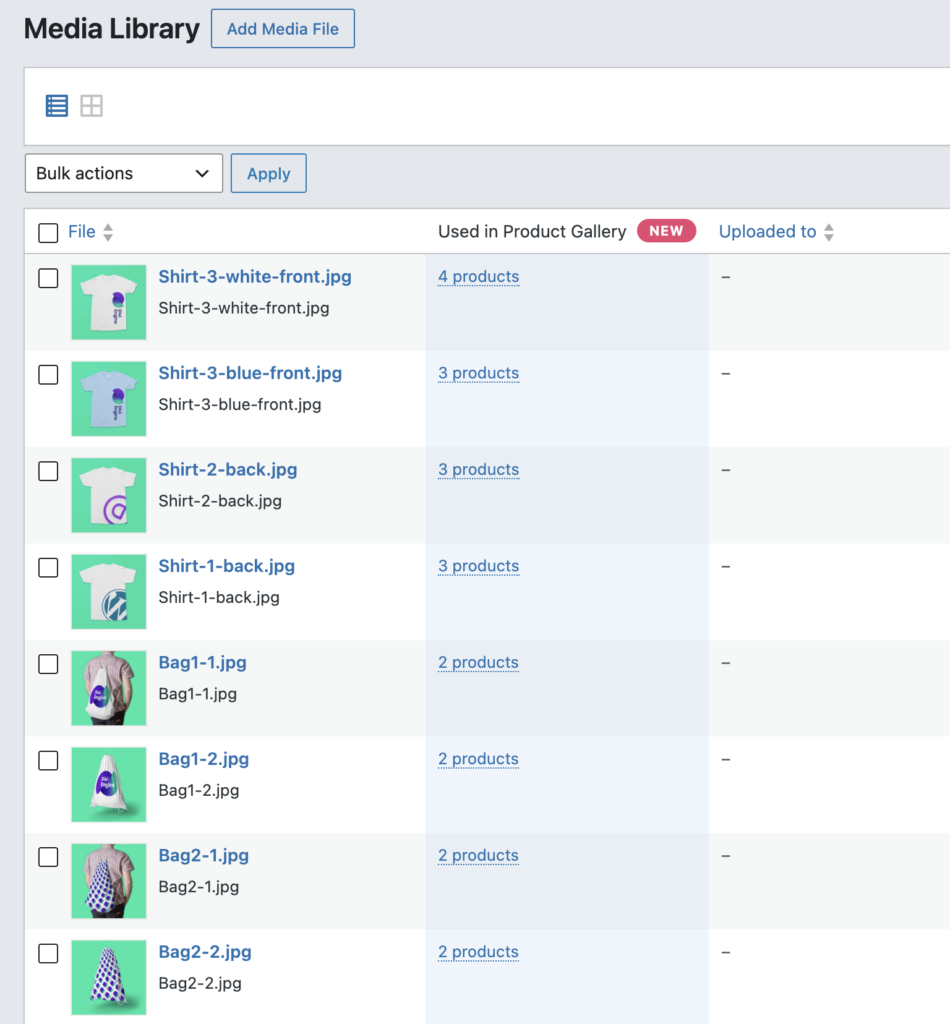
WooCommerce Product Galleries
And for WooCommerce we have the new “Used in Product Gallery” column in the WordPress media library, showing exactly how many products use each image in a product gallery.
WooCommerce product galleries frequently contain dozens of images spread across products and variations. Because these gallery relationships are hidden in WordPress, it’s easy to accidentally delete images that are still used in your store. Admin Columns reveals exactly which products use an image in their gallery, making it easy to manage product photos without risking broken product pages.
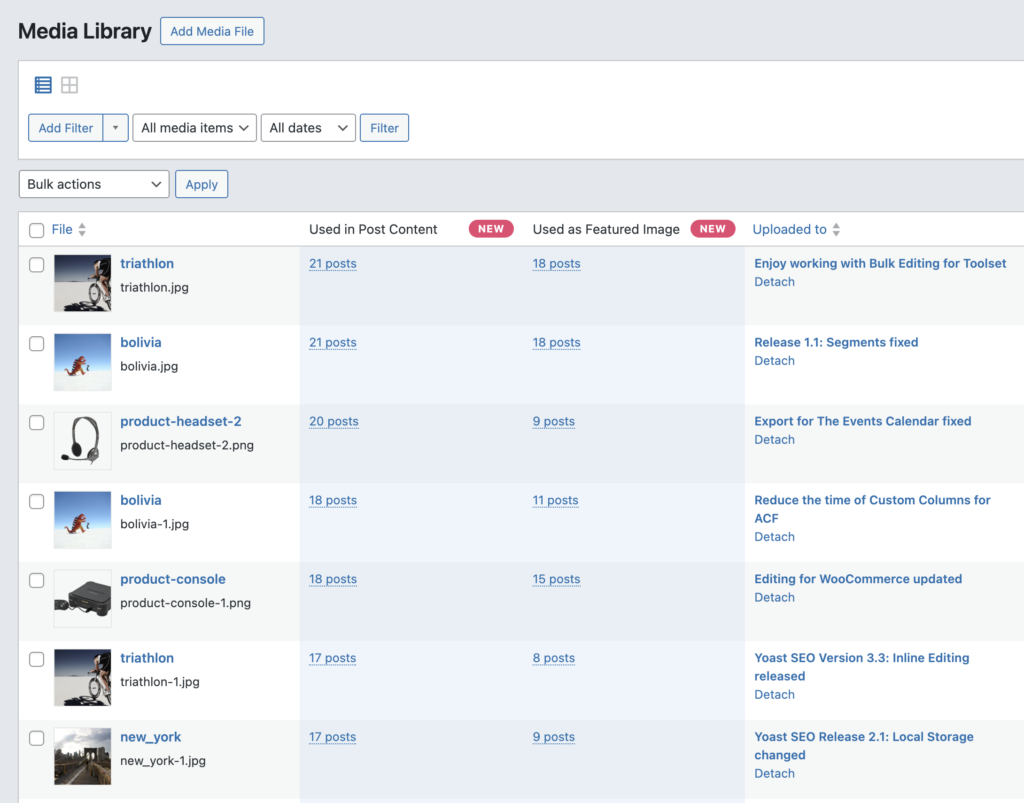
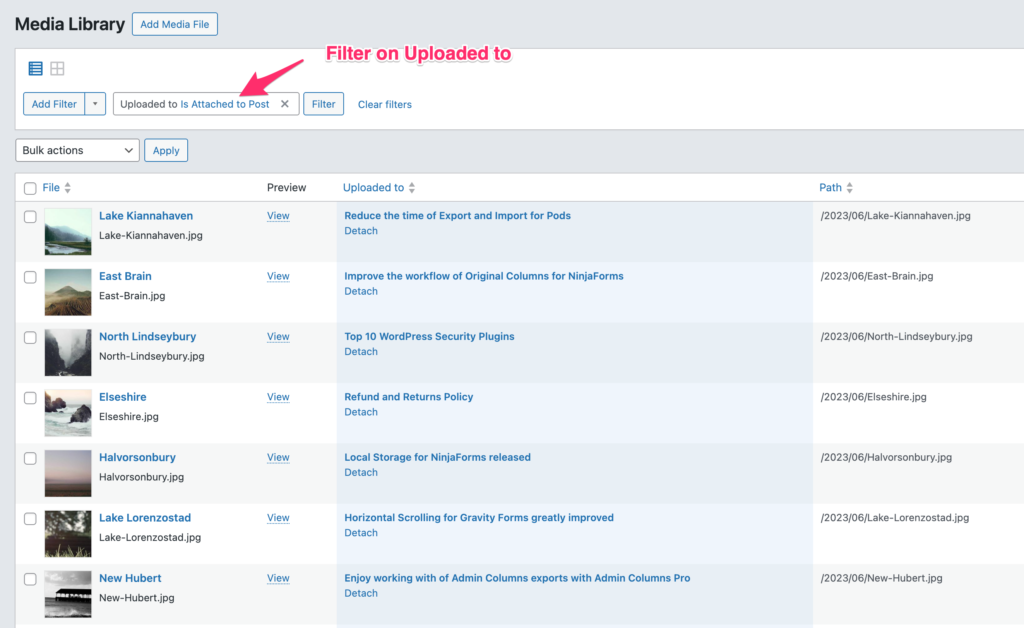
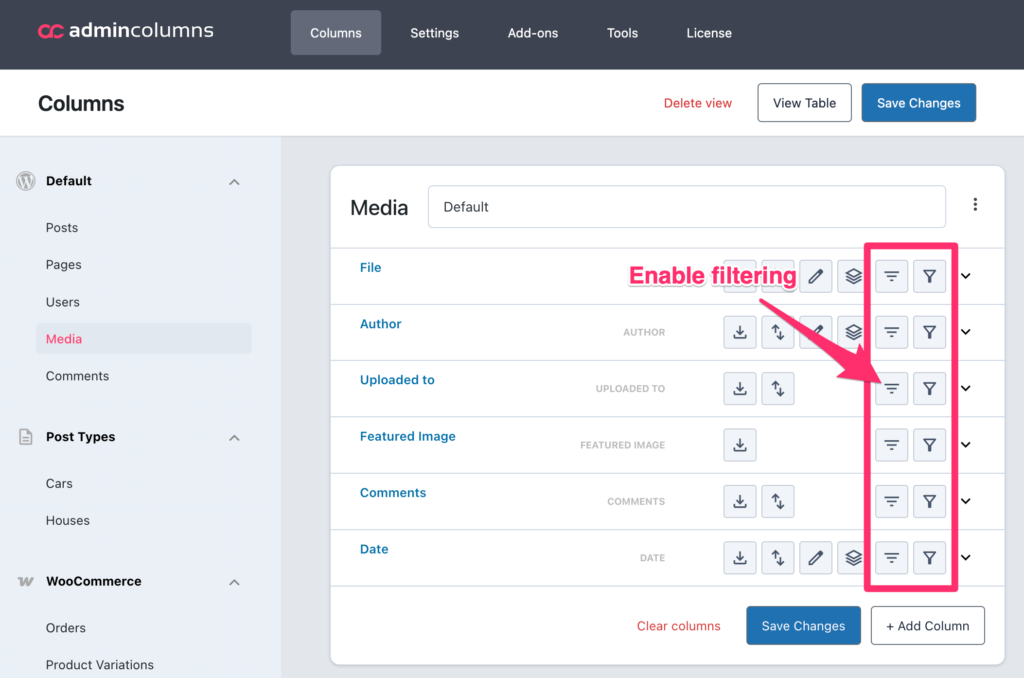
Improved Upload To
The enhanced “Uploaded to” column becomes actually useful with sorting and filtering capabilities. Unlike WordPress’s static display, you can now organize and search through this data.
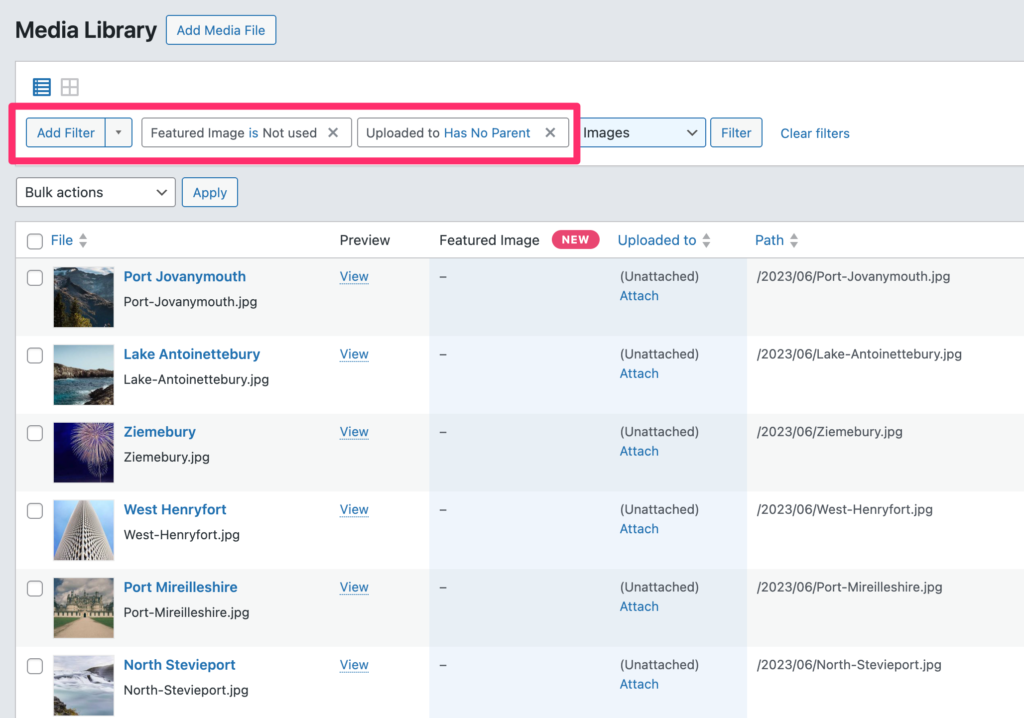
Smart Filters deliver instant answers: Combine “Used as Featured Image = No” AND “Uploaded to = Unattached” to isolate potentially unused images. But here’s the catch – this won’t catch images embedded in content, widgets, or page builders, so manual verification remains essential.
Setup workflow
-
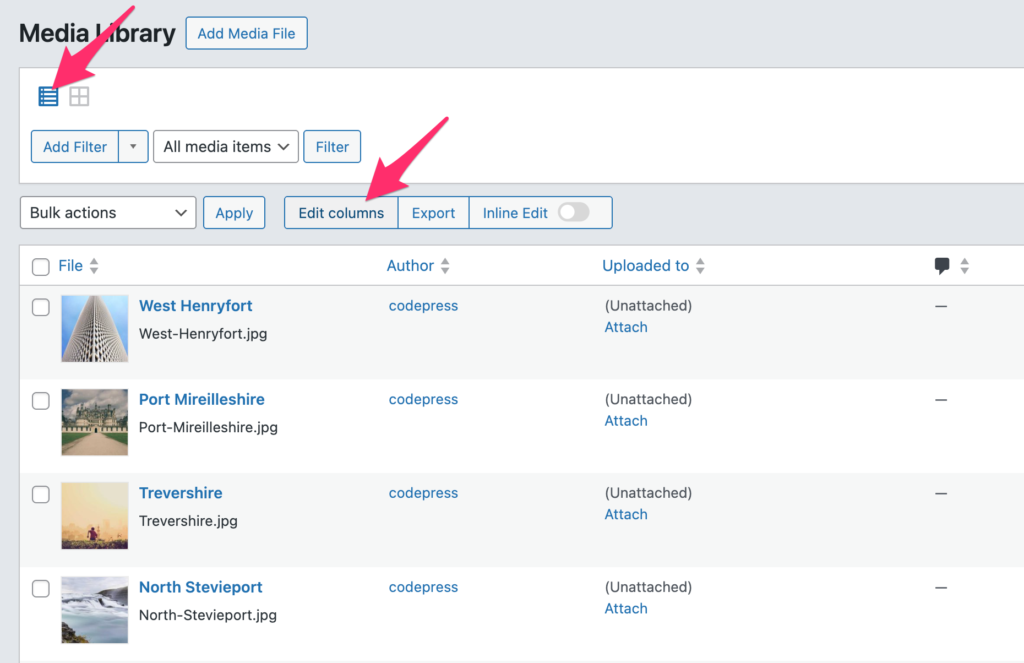
Navigate to Media Library > Switch to List View > Click “Edit Columns.”
-
Add “Used as Featured Image”, “Uploaded to”, “Used in Post Content” columns.
-
Enable Smart Filtering on key columns for instant relationship discovery.
-
Save filter combinations as “Unused Images” preset for monthly maintenance.
After finding relationships
The bulk editing interface lets you select multiple filtered images and update alt text, captions, or attachment relationships simultaneously. Need a quick fix? The inline editing feature handles individual changes without opening separate screens.
Export filtered results to CSV for stakeholder approval before deletion – essential when you’re about to delete 500 images and need someone else’s sign-off.
Way 2: Combine Admin Columns with usage discovery plugins
While Admin Columns excels at displaying featured image relationships and enabling bulk management, it has one limitation: it can’t tell you where images appear within post content, widget areas, or page builder modules. That’s where specialized discovery tools come in.
The two-tool strategy that actually works:
Combine Admin Columns’ management power with Image Source Control’s deep scanning capabilities for complete visibility into image usage.
Phase 1: Discovery with Image Source Control
Image Source Control tracks attachments, but it can also check whether an image appears as:
- A featured image (via attachment ID).
- Content within posts and pages (via URL or ID).
- Data in post meta fields.
- References in theme options.
Here’s the discovery workflow:
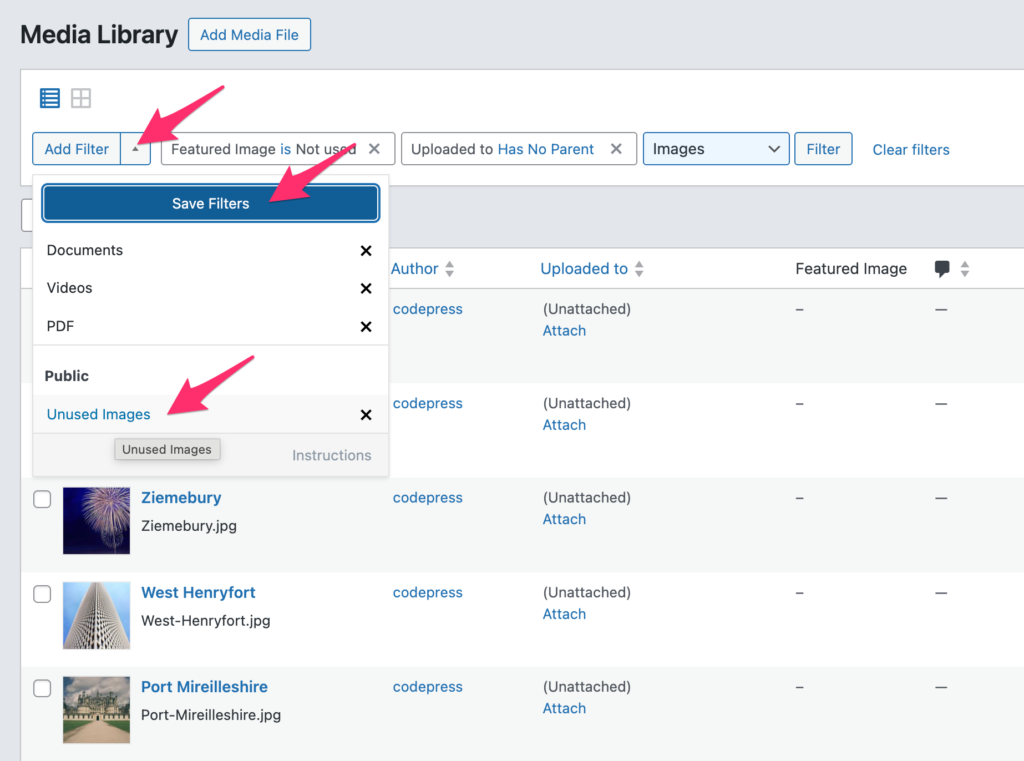
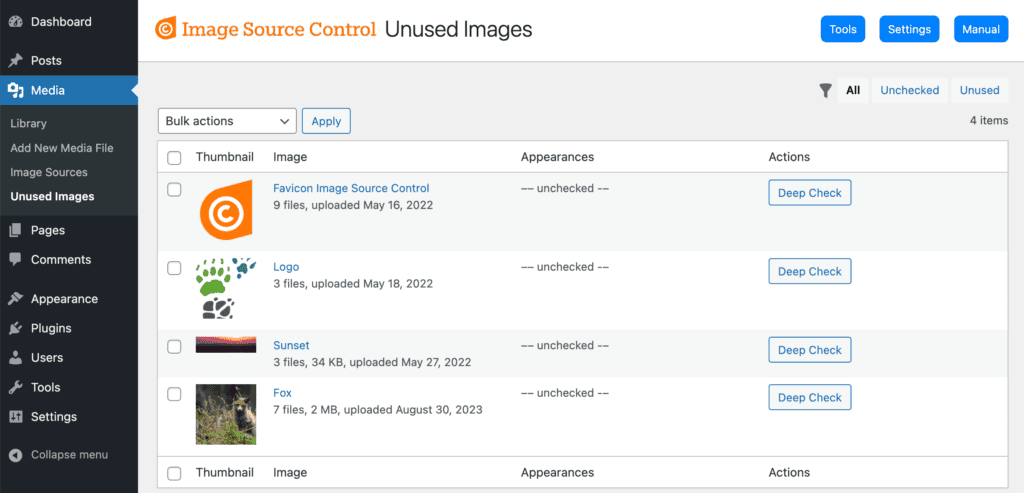
- Navigate to Media > Unused Images.
- Select all images you want to verify.
- In the “Bulk actions” dropdown, select “Deep Check” and apply.
- The tool searches for both image URLs and attachment IDs across your entire database.
- Results clearly show which images are genuinely unused.
The “Deep Check” feature is what sets this apart – it doesn’t just look at parent relationships; it actually searches for where images exist in your content.
You can also use the Indexer tool to go through all published content in the front end and look for used image URLs. Find this feature by going to Media > Unused Images > Run Indexer and running the index.
Phase 2: Management with Admin Columns
Once Image Source Control reveals the true relationships, switch to Admin Columns for efficient cleanup:
- Create custom columns to display usage data from your scan.
- Add tags or custom fields to mark images as “verified in use” vs “safe to delete.”
- Build saved filter views like “Verified Unused – Ready for Deletion.”
- Export filtered lists for team review or client approval before deletion.
This combination gives you discovery depth plus management efficiency.
Alternative scanning tools:
Media Cleaner (by Meow Apps) offers filesystem analysis and compatibility with page builders like Elementor and Divi. Database Cleaner tackles orphaned data from a different angle, focusing on database optimization.
Critical limitation: These automated tools frequently generate false positives, especially with custom themes or complex page builders. Always verify results manually before bulk deletion.
When they’re most useful: Quick cleanup of obviously orphaned files when you need immediate storage reduction and can accept some risk.
Way 3: Build a two-step verification system
The safest approach isn’t trusting any single tool but implementing a two-step verification system that catches what automated scans miss.
- Filter for candidates: Use Admin Columns’ Smart Filters to isolate potentially unused images (Featured Image = No, Uploaded to = Unattached).
- Manual spot-check: Search the filenames of 5 random “unused” results in your site’s post content. If even one appears, your filter criteria needs adjustment.
This is very important because even advanced tools can miss hardcoded theme references, CDN usage, or complex builder structures. Besides that, every cleanup plugin generates false positives.
Once you’ve done the quick check, you can proceed to this safe deletion workflow:
- Apply Smart Filters to identify unused candidates.
- Manually verify 5 random results by searching for filenames in post content.
- Test deletion on a staging environment when possible.
- Delete through the WordPress Media Library interface to maintain database consistency.
- Run a complete site backup before any bulk media deletion.
💡Pro tip: Forget perfect optimization. Success means “nothing broke” plus reclaimed storage.
Way 4: Check the database directly
If you were wondering, yes, direct database queries can search wp_posts for image URLs, though Admin Columns provides the same visibility without SQL knowledge.
Basic MySQL approach: Access phpMyAdmin through your hosting control panel, select your WordPress database, and run queries. For better accuracy, use REGEXP to catch image variations:
SELECT * FROM wp_posts
WHERE post_content REGEXP 'image-name[^[:space:]]*\\.jpg'
AND post_type != 'revision'
This catches all size variations (image-name-150×150.jpg, image-name-1024×768.jpg, etc.).
When this helps: Catching hardcoded theme references in template files or external CDN links that bypass WordPress’s media system entirely. Also useful when plugins store image references in unexpected database locations.
Performance warning: Complex searches on large databases can spike CPU usage and cause timeouts on shared hosting.
Way 5: Browse the file system
cPanel file system browsing: Navigate to /wp-content/uploads/ via FTP or your hosting file manager to see actual files stored on your server versus what’s registered in WordPress.
The challenge: Files exist in year/month folders without a clear connection to posts. Matching physical files to WordPress records requires manual detective work and provides no usage relationships.
When it’s useful: Last resort for identifying orphaned files when automated tools fail or after botched migrations leave phantom files.
Critical limitation: You see files but not where they’re used – deletion remains risky without cross-referencing the database.
Best practices for preventing future bloat
Prevention beats cleanup every time. These practices transform chaotic media libraries into organized, searchable assets that never require emergency purges.
Descriptive file naming
Those camera-generated strings – IMG_739472.jpg, DSC_0043.png – create future search nightmares. Before uploading, rename files to describe their content: “wordpress-dashboard-screenshot.jpg” or “blue-widget-product-photo.png”.
Why it matters: When you’re hunting for that specific hero image six months later, searching “hero” actually finds something. Plus, descriptive filenames boost SEO when images appear in search results.
Quick tip: Use hyphens, not underscores. Google treats hyphens as word separators but reads underscores as connectors.
Immediate organization
Stop dumping files into WordPress’s default year/month folders. Create logical structures during upload, not during panic-driven cleanup sessions.
We recommend using a good media organization tool, like FileBird, that creates virtual folders without touching actual file paths.
Set up structures like /products/widgets/and /blog/tutorials/, and tag images with “homepage,” “testimonial,” or “2024-campaign” for instant filtering later.
Alt text discipline
That empty alt text field during upload? Fill it immediately. “Blue ceramic coffee mug on wooden table” beats discovering 500 images labeled “Untitled” when you need specific product shots.
Alt text serves triple duty:
- Accessibility for screen readers.
- SEO signals for image search.
- Internal searchability through WordPress search.
Regular maintenance schedule
Set calendar reminders for monthly media audits. Using saved Admin Columns filter presets, a 10-minute check catches orphaned files before they multiply into hours of cleanup.
Monthly checklist:
- Run “Unused Images” filter preset.
- Review files uploaded without alt text.
- Check for duplicate uploads of similar images.
- Verify large files aren’t being served at full size.
Upload size controls
Configure Settings > Media to set reasonable maximum dimensions. Why store 4000×3000 pixel images when your content area maxes at 1200 pixels wide?
Use a plugin like Imagify to compress images during upload automatically, or sites like TinyPNG to do this before uploading.
Find out where your images are used today
That 5GB media library that seemed like a minefield? It’s now just another manageable WordPress task.
Understanding where WordPress stores image relationships – those five specific locations we mapped out – transforms paralyzing cleanup into routine data management. You’re no longer playing detective with mysterious connections but simply checking known storage points and making informed decisions.
And with Admin Columns, you don’t have to stare at hundreds of “unattached” files, wondering which ones power your homepage. Instead, you see clear columns showing “Used as Featured Image: Yes” or “Uploaded to: About Us page.” The relationships were always there – now they’re visible and manageable.
Ready to take control? Get started with Admin Columns and transform your media library from a source of anxiety into an organized, searchable asset that actually helps you work faster.
Get Admin Columns Pro
Effortlessly sort, filter, edit, export, and organize content in the WordPress admin.
