
Building Composer Support for Admin Columns
We have some good news for those who like to manage their plugins with Composer: starting today you can manage Admin Columns Pro with Composer. If you are interested in supporting Composer for a plugin, this article is for you. For those who just want to enable it for Admin Columns Pro: check out the documentation.
Dependency management in PHP is mostly done with Composer. It’s a great way to automate and dictate which packages your website or application needs ready for use. For WordPress development, WordPress Packagist is a nice platform that helps you manage WordPress plugins and themes with Composer. However, WordPress Packagist only supports free plugins and themes.
To enable Composer support for a premium product you can use an existing solution like packagist.com or craft something yourself. In our case, crafting something ourselves was the best option. Not only do we ❤️ writing code, but we also wanted to support our custom rules for authenticating users. Let’s get our hands dirty!
Steps Towards Composer Support
We made sure these things were in place:
- An easy to use section in the my-account area for managing your Composer tokens
- Endpoints for the Composer calls to packages.json and the specific downloads
- Support to authenticate and authorize the Composer calls
- Easy to understand documentation to make sure everyone can use it
Managing Your Composer Tokens
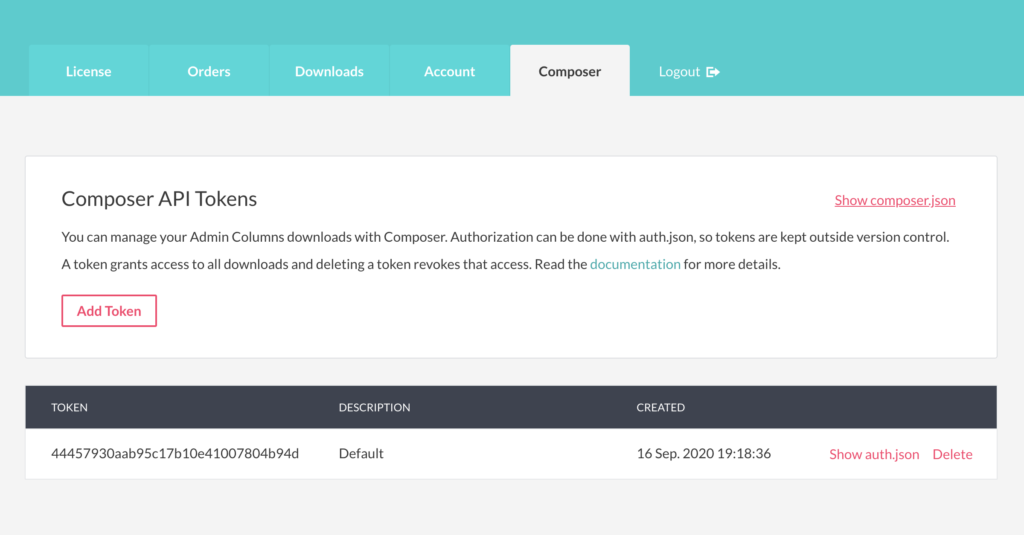
We love making things easy for our customers, so we gave the process of managing tokens a lot of thought. One of the key aspects we wanted was the ability to give an individual (developer) access to the Composer API, without giving access to your account. To facilitate that, you can give each developer a unique token that only gives access to the Composer API and nothing more. Adding and removing tokens is done with a few clicks and works instantly. Each token can also be provided with a description to help you remember why you created this token. And to aid you further, we added JSON snippets for auth.json per token and a composer.json for copy-pasting. If you already use Composer, you can be up and running in a couple of minutes.
This is how it looks at the time of writing:
Supporting Composer Calls
The Composer-flow is very simple: you specify a repository and a type and Composer looks there for packages and tries to download what you have specified from that repository. And in the process, it can read an auth.json file to send credentials along with each request.
In our case, we added a repository of the type ‘composer’:
{
    "repositories": [
        {
            "type": "composer",
            "url": "https://composer.admincolumns.com"
        }
    ],
    "require": {
        "admin-columns/admin-columns-pro": "*"
    }
}
You can find a more complete version of composer.json in your account under the Composer section. The idea is just to copy-paste it in your own composer.json, maybe change which packages and versions you want, and it should be ready to use.
Now for supporting the requests Composer makes. While these requests cannot be changed, how you handle them can be adjusted. And that is precisely where the magic is. The trick is to create a rewrite rule in your web server that deals with the /packages.json request. In our case, that call goes to https://composer.admincolumns.com/packages.json. A simplified example of how we did it:
location = /packages.json {
    return 301 https://www.admincolumns.com/?request=composer-packages;
}
Our approach was to set up an Nginx Reverse Proxy to handle all requests from Composer. The reverse proxy is responsible for rewriting the calls from Composer into something our own API understands. Using a reverse proxy allows you to keep the Composer API running regardless of where you host your website. But you can also handle it directly on the same server as your website is running. A matter of preference really. The (JSON) response should be a list of packages you offer for download. Composer has good documentation on this.
Handling Version Constraints
A thing easily overlooked is how Composer handles versions. It’s the * (asterisk) that can easily cause problems. It means something like: give me the latest version. Admin Columns can be used even when your license expires, but you won’t have access to newer versions. So what if your license expires and a new version is released? The * would give an error, as the latest version in /packages.json is not downloadable. The solution is to take that into account when /packages.json is requested. We generate a customized response per customer. This way, using an * as a version constraint always works as only the versions your account supports are added to /packages.json. Sure, it might delay things a little, but that is way better than keeping taps on what ‘your’ latest version is.
Authenticating Calls
You need to send an Authorization header with a bearer token to authenticate and to use the Composer API. If you use an auth.json file, Composer will set this header for you automatically. The auth.json file solves the issue of credentials leaking into your repository, which is something you don’t want for obvious reasons. Just don’t forget to tell version control to ignore the auth.json file, or your quest for a credential-free repository might fail. This is what an auth.json file could look like:
{
    "bearer": {
        "composer.admincolumns.com": "41a1968c0071c17c3b32620b05b513bc"
    }
}
Composer will send the token along with each request now. Our website will read the bearer token from the request and if it can find an account with this token, it will handle the call. We use PHP to read the header from the Server environment. Most servers running PHP are configured to put the Authorization header value into the HTTP_AUTHORIZATION header, but it might vary depending on how your environment is configured. This is a simplified example to get the token from the request with PHP:
$header = filter_input( INPUT_SERVER, 'HTTP_AUTHORIZATION', FILTER_SANITIZE_STRING );

if ( $header ) {
    $token = str_replace( 'Bearer ', '', $header );
}
And lastly, if no token is found, the response contains a proper 401 header.
Documentation
I wrote this article for people who are waiting for Composer support and be like: hurray (or so I hope). And, of course, for those who want to try to set up something similar themselves. For those who want to start using it: we have documentation in place that will tell you how to get going. It should help you to integrate Composer into your workflow in minutes!
Wrapping Up
Composer support has been on our list for a long time and we are excited it’s here. I hope it will help you to integrate Admin Columns more easily into your current or next project.
We would be more than happy to have your feedback or questions. Also, if things in the article are unclear, let me know as well so I can make it more clear to our readers. Cheers from us!